vfio
- HW Specs used in this example
- Preparations
- Isolating the GPU
- Windows10 setup
- Audio Setup without crackling
- Audio receiver on Linux
- Setup in action
Vfio setup / piping a Geforce into KVM Windows10
There are several tutorials out there about how to setup a Windows10 KVM environment with a dedicated GPU to run windows games without doing dual boot setup. However most of them are kind of outdated, or are using libvirt, pulseaudio or other stuff I don't want to use. Thus here's my "keep it simple stupid" solution.
HW Specs used in this example
- AMDAMD Ryzen 9 3900X
- Radeon RX 5700 XT (for Linux)
- GeForce GTX 1660 (for Windows inside KVM)
Preparations
This is an example for archlinux, but should work similar on other distros.
Install:pacman -S edk2-ovmf qemu zenity- looking-glass
- looking-glass-module-dkms
- vban-git
Isolating the GPU
Ensure you have an "IOMMU Group" with only the GPU you want to pass to KVM by running this script as root:
#!/bin/bash
for g in /sys/kernel/iommu_groups/*; do
    echo "IOMMU Group ${g##*/}:"
    for d in $g/devices/*; do
        echo -e "\t$(lspci -nns ${d##*/})"
    done;
done;
You might need to physically rearrange the graphics cards in your computer to achive this. This is how it looks for me:
IOMMU Group 16:
	09:00.0 VGA compatible controller [0300]: NVIDIA Corporation TU116 [GeForce GTX 1660] [10de:2184] (rev a1)
	09:00.1 Audio device [0403]: NVIDIA Corporation TU116 High Definition Audio Controller [10de:1aeb] (rev a1)
	09:00.2 USB controller [0c03]: NVIDIA Corporation TU116 USB 3.1 Host Controller [10de:1aec] (rev a1)
09:00.3 Serial bus controller [0c80]: NVIDIA Corporation TU116 USB Type-C UCSI Controller [10de:1aed] (rev a1)MODULES="vfio_pci vfio vfio_iommu_type1 vfio_virqfd amdgpu"vfio-pci.ids=10de:2184,10de:1aeb,10de:1aec,10de:1aed amd_iommu=on kvm.ignore_msrs=1 kvm.kvm report_ignored_msrs=0 vfio-pci.disable_vga=1 vfio-pci.disable_idle_d3=1 pci=noats amd_iommu=fullflush hugepagesz=1G default_hugepagesz=1Gblacklist nvidia-nvlink
blacklist i2c_nvidia_gpu
blacklist nvidia
blacklist nouveau
#!/bin/bash

if ! pidof qemu-system-x86_64
then
        cp /usr/share/edk2-ovmf/x64/OVMF_VARS.fd /tmp/

        touch /dev/shm/looking-glass
        taskset -c 0-9 qemu-system-x86_64 \
            -name "Win10" \
            -drive if=pflash,format=raw,readonly,file=/usr/share/edk2-ovmf/x64/OVMF_CODE.fd \
            -drive if=pflash,format=raw,file=/tmp/OVMF_VARS.fd \
            \
            -cpu host,kvm=off,hv_vendor_id=12341234 \
            -machine 'type=q35,kernel_irqchip=on' \
            -enable-kvm \
            -m 12G \
            -smp cores=10 \
            \
            -device vfio-pci,host=09:00.0 \
            -device vfio-pci,host=09:00.1 \
            -device vfio-pci,host=09:00.2 \
            -device vfio-pci,host=09:00.3 \
            -nographic \
            -vga none \
            \
            -device virtio-serial-pci \
            -chardev spicevmc,id=vdagent,name=vdagent \
            -spice unix,addr=/tmp/vm_spice.socket,disable-ticketing \
            -device virtserialport,chardev=vdagent,name=com.redhat.spice.0 \
            \
            -usb -device usb-host,vendorid=0x04f2,productid=0x0963 \
            -usb -device usb-host,vendorid=0x03f0,productid=0x1041 \
            \
            -device ivshmem-plain,memdev=ivshmem,bus=pcie.0 \
            -object memory-backend-file,id=ivshmem,share=on,mem-path=/dev/shm/looking-glass,size=64M \
            \
            -monitor unix:/tmp/wintendo.sock,server,nowait \
            \
            -drive file=/mnt/fast/win_with_spice.qcow2,if=virtio \
            \
            -device virtio-net-pci,netdev=n0 \
            -netdev user,id=n0,smb=$HOME \
            &

        sleep 2 | zenity --progress --pulsate --auto-close --auto-kill --text="Booting Wintendo" --no-cancel
fi

if ! pidof vban_receptor
then
        vban_receptor -i 127.0.0.1 -p 6980 -s Stream1 &
fi

if ! looking-glass
then
        looking-glass -f /dev/shm/looking-glass win:minimizeOnFocusLoss=no -F -c /tmp/vm_spice.socket -p 0 app:framePollInterval=6000 win:fpsMin=120 app:cursorPollInterval=6000
fi
Windows10 setup
Audio Setup without crackling
With pure qemu audio emulation I was having some audio issues, which I was not able to solve using any of the qemu tweaks around. But there's a low-latency Audio Streaming Tool for Windows, which offers a virtual soundcard driver to send the audio via UDP to an recevier: VOICEMEETER BANANA
Chosing the virtual sound card in Windows: Banana Setup:
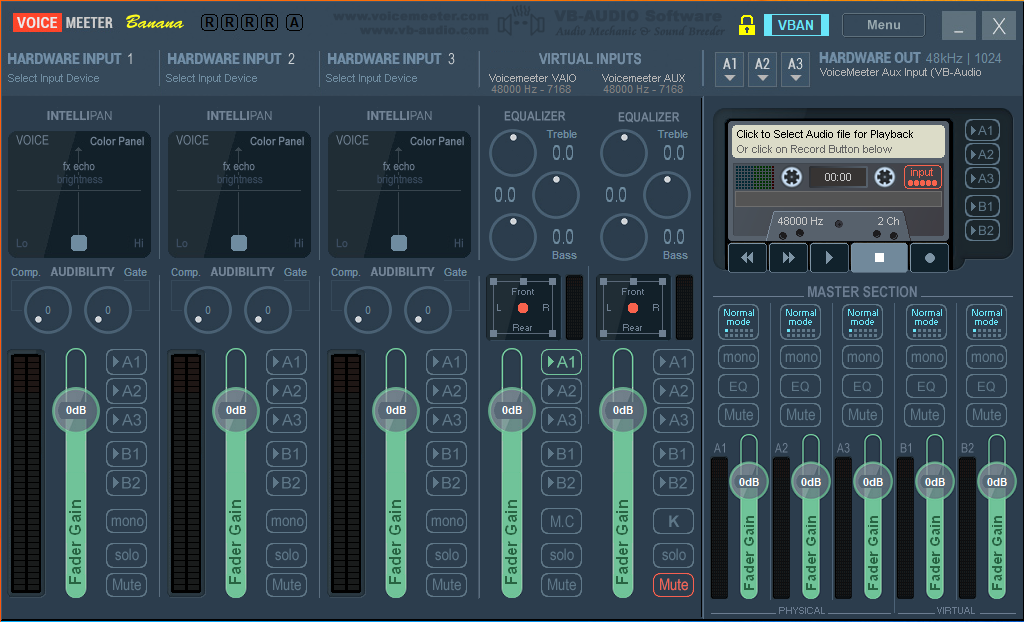 Banana settings dialog:
 Banana VBAN streaming dialog:
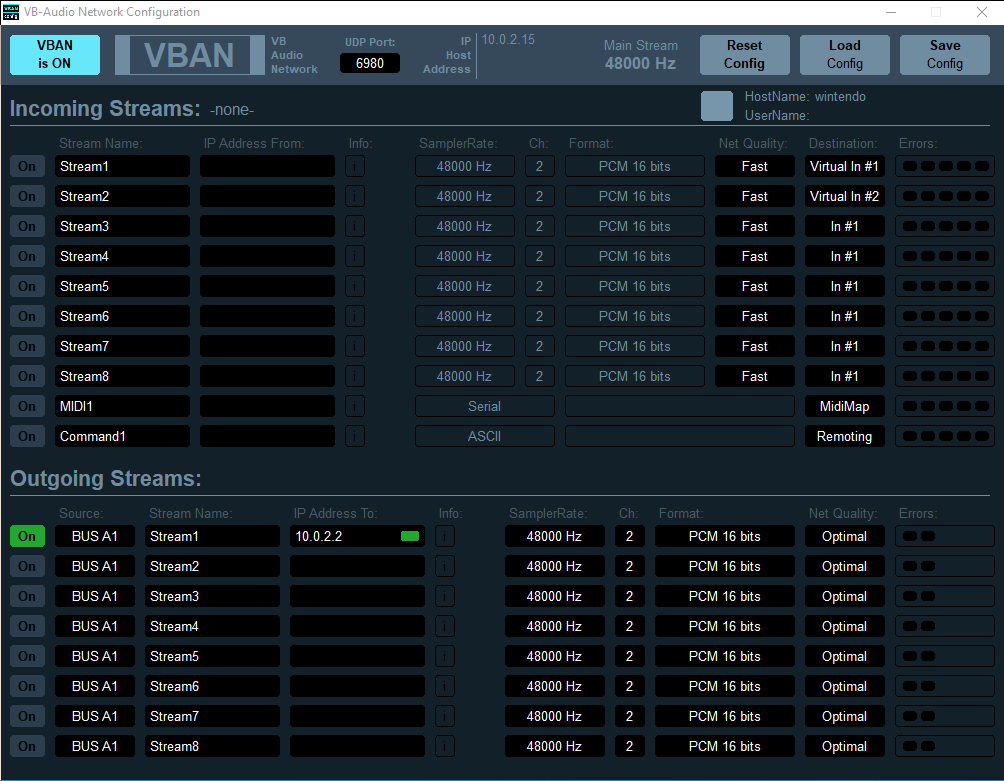
To ensure the Voicemeeter Banana is always sending the UDP packets in sync, the priority can be increased in Windows by creating a set_priority.bat file and calling it:
wmic process where name="voicemeeterpro.exe" CALL setpriority "realtime"Audio receiver on Linux
As you can see in the start script on Linux side, there's a VBAN receptor waiting for the udp packets containing the sound and playing them on ALSA or pulseaudio.